Part of the Tales of Nebezem Series. Help Tyyni, a student at the Academy of Magic, solve puzzles of the Mind Trial. Kongregate.
===========
You can access save and load by pressing ‘esc’ on your keyboard.
Mind Trial Entrance
Enter the appropriate number sequence to gain access.
1. There are 4 shapes on the wall. The 4-digit sequence you need to enter at the gate is the number of sides of each shape. (Note: Jaakko gives a hint if you enter a wrong sequence then talk to him)
2. Go to the gate and enter ‘3-6-4-5’
~~
Room 1: Pathfinding
Cross the room by visiting each tile once.
Follow the path in the image below.

~~
Room 2: Detail attention
Achieve mirror symmetry on either side of the river.
Flip the objects circled in the image below.

It gets brighter and the rain lightens as you flip more stuff correctly!
~~
Room 3: Elemental harmony
Each row and each column must contain one of each element.
Interact with the interact-able squares until they become the elements shown below.

~~
Room 4: Spatial layout
Each basket must be next to as many baskets, as the number of apples contained in it. Diagonals do not count.
Talk to the translucent man and select a difficulty level. Push/pull the baskets until they become like the images below. You can talk to the translucent man again to reset the stage or re-select the difficulty.
Lower Difficulty

Higher Difficulty (24 moves, full 100 efficiency score)

- Push B down 2x
- Push A right 2x, down 1x
- Push C down 2x
- Push D down 1x, left 1x
- Push E up 3x, right 1x
- Push F up 2x
- Push G up 2x
- Push I up 3x
- Push H right 1x, up 3x
- You should end up with this:

~~
Room 5: Spatial logics
Find your way through.
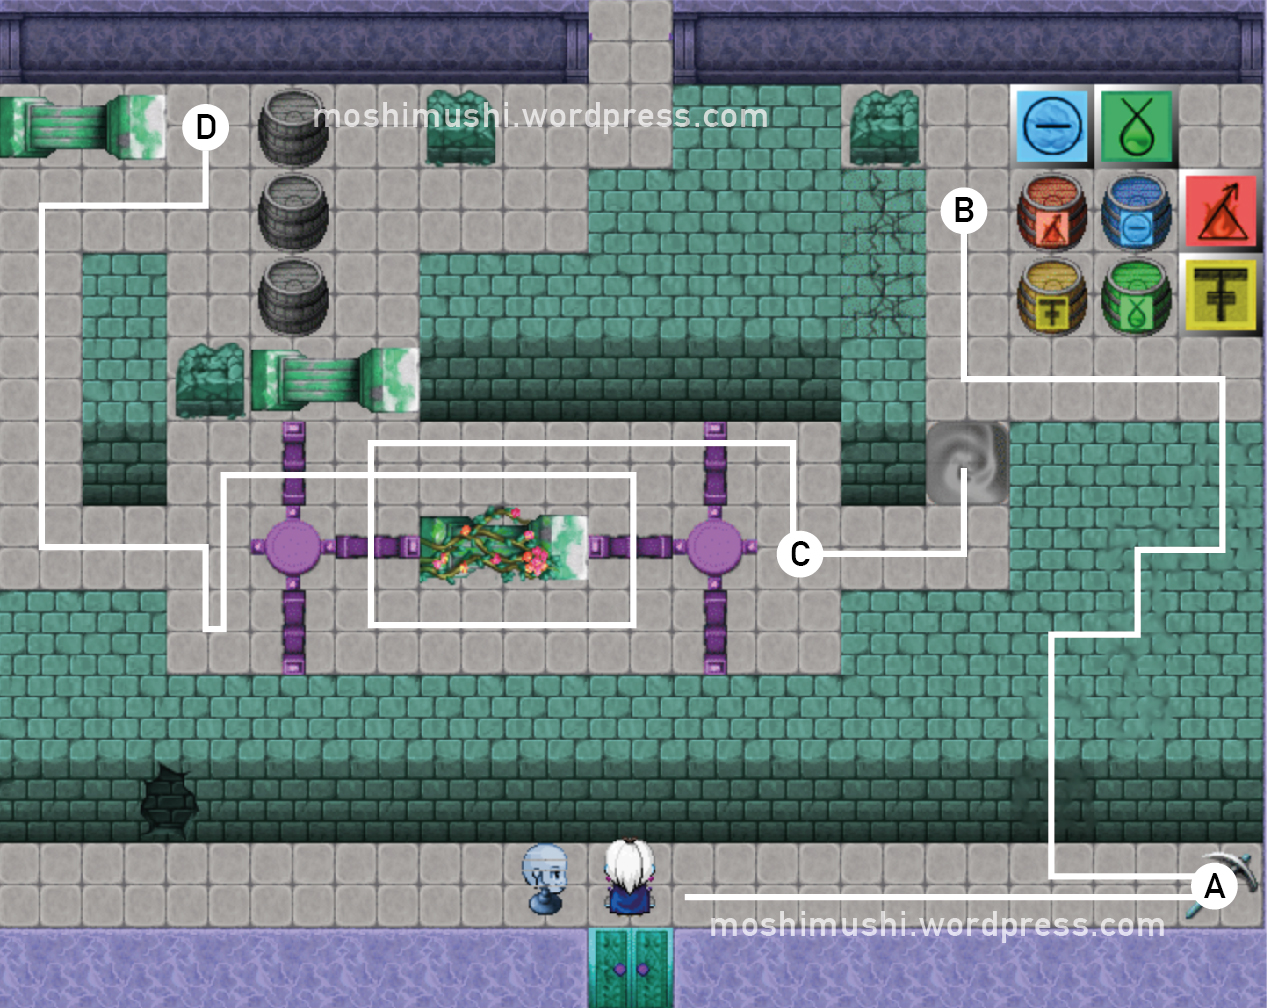
A.
Grab the pickaxe before making your way north through the wall projection (slightly darkened portion of the wall). Notice that the part of the wall you can walk through is slightly blurred.
B.
1. Use pickaxe on the cracked wall to the left of the barrels
2. Pull red barrel left 1x
3. Push blue barrel left 1x
4. Push green barrel up 2x
5. Push yellow barrel right 2x
6. Push blue barrel up 1x
7. Push red barrel right 3x. The magical screen will open.
C.
Follow the path shown in the image above.
D.
1. Push the top barrel right 1x
2. Push the bottom barrel right 1x
3. Push the middle barrel up 1x.
~~
Room 6: Sequential memory
Observe and copy sequence.
Note: Make sure the element lights up before you go on to the next one.
1. Step through the portal on your left. Tyyni will be sent to the center of the 4 tiles.
2. Red, Green
3. Red, Green, Red
4. Red, Green, Red, Blue
5. Red, Green, Red, Blue, Blue
6. Red, Green, Red, Blue, Blue, Green
7. Red, Green, Red, Blue, Blue, Green, Yellow
8. Red, Green, Red, Blue, Blue, Green, Yellow, Green
9. Red, Green, Red, Blue, Blue, Green, Yellow, Green, Red
10. Red, Green, Red, Blue, Blue, Green, Yellow, Green, Red, Yellow
11. Red, Green, Red, Blue, Blue, Green, Yellow, Green, Red, Yellow, Yellow
12. Red, Green, Red, Blue, Blue, Green, Yellow, Green, Red, Yellow, Yellow, Blue
~~
Room 7: Unstable environment management
Create elemental harmony by connecting the element containment units to the core.
Note: You can use the lever on the top right corner if you need to reset the elements.
1. Push Blue right, up, left, down, then right. Blue is connected to the core.
2. Push Green down, left, down, left, then up. Green is connected to the core.
3. Push Yellow up, left, then up.
4. Push Red right, up, right, then down. Red is connected to the core.
5. Push Yellow down. Yellow is connected to the core.
~~
Room 8: Cooperation ability
Activate all four locks simultaneously.
Note:
– Press ‘1’ or click the cat icon on the bottom right corner to mind control the cat or stop mind controlling it.
– Blue switches can only be activated by the cat and yellow switches by Tyyni. Blue switches affect blue spikes, yellow switches affect yellow spikes.
1. Talk to the translucent man. A cat will appear.
2. Tyyni – Move to stand on the tile that’s surrounded on 3 sides by spikes, one of which is lowered.
3. Cat – Step on the upper right switch. The spikes to the right of Tyyni will be lowered.
4. Tyyni – Go pass the lowered spikes and step on the switch to the right. The spikes blocking the cat from leaving the area with 3 blue switches will be lowered. Have Tyyni return to the position in step 2.
5. Cat – Step on the switch to the left of the one in step 3. The spikes above Tyyni will be lowered.
6. Tyyni – Go pass the newly-lowered spikes above and move to step on the yellow switch at the upper right.
7. Cat – Go pass the lowered spikes and step on the blue switch at the upper left corner. The gray magical screen near one of the yellow spikes will disappear. Return to the area with 3 blue switches. Step on the bottom left switch. The spikes blocking Tyyni from the cat will be lowered.
8. Tyyni – Go pass the newly-lowered spikes and step on the yellow switch partially blocked by trees, nearest to the area with 3 blue switches. The spikes blocking the way to 1 blue and 1 yellow switch will be lowered. Pass through the newly-lowered spikes and step on the yellow switch. The spikes blocking the rat will be lowered.
9. Cat – Step on the blue switch beside Tyyni. The spikes beside the green barrel will be lowered. Catch the rat and place it on the red circle by the gate.
10. Tyyni – Pull the green barrel right 2x. Push it down 1x. Pull it right 5x. Pull it up 2x and push it up 1x into the green circle. Step on the yellow circle.
11. Cat – Step on the blue circle.
12. Tyyni – Leave the room.
~~
Room 9: Route tracking
Connect all elemental receptacles to their generators.
~~
Room 10: Environment alteration flexibility
Map 1
Go through the gate at the north to the next room.
Map 2: Find your way through the magical screens
Interact with the magical screens in the order shown below. Interacting with certain screens in a certain order deactivates other screens.

Map 3
1. Go to the magical screens on the lower right and interact. Tyyni will use telekinesis to move the bag. Stop her telekinesis when the bag is on the red switch.
2. Do the same for the bag on the upper left, beyond the other two magical screens.
Map 4: Assemble instruction parts
The words on the plaques, when put together, says, “Travel between doors three times”. Do so.
Map 5: Find an alternative path
Go through the gap between trees on the left. You’ll end up on the other side of the map. Leave through the open gate.
Map 6: Search the shadows
Find 7 keys at the areas indicated in the image below.

Map 7: Employ cooperation
1. Grab the red-orange sausages at the top of the map.
2. Use it on the dog and it will follow you. Bring it to the red switch. Walk slower if you find that the dog is too far behind and wanders off or gets stuck.
Map 8: Stop to smell the flowers
Interact with each bunch of flowers once.
~~
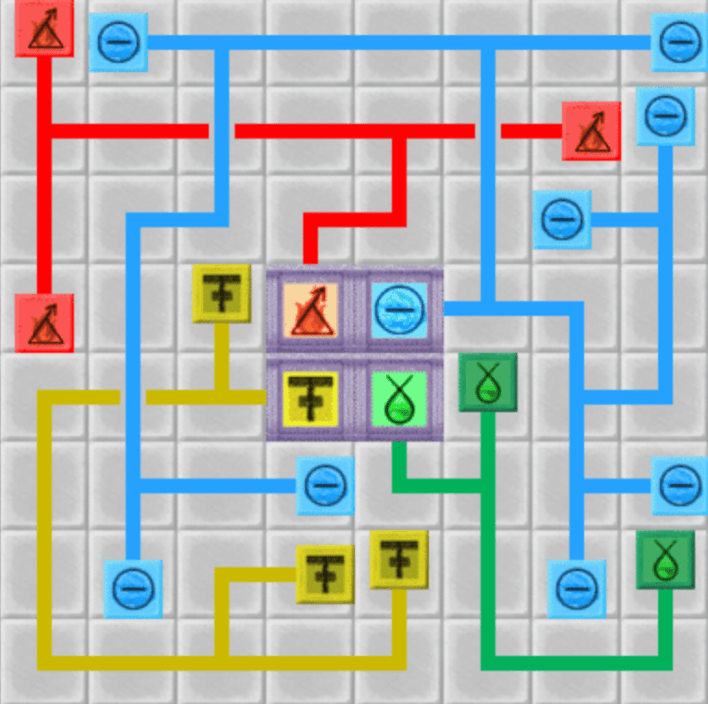
Room 11: Efficient space utilization
Connect all four pairs of elements, e.g., air to air.
1. Start by interacting with the lower blue element to activate it. Follow the path shown below and interact with the upper blue element to stop setting blue colour.
2. Repeat for yellow;
3. green;
4. and red.

~~
Room 12: Mirror illusion exploitation test
Manipulate your doppelgänger into aiding you.
1. Move right 2x, up 3x, left 3x, down 1x, right 1x, down 1x, right 2x and up 2x. The doppelgänger will break the right switch on the mirror side.
2. Move up 1x, right 5x, down 4x, left 5x, up 3x, left 2x, down 1x, left 2x, down 1x, left 1x. The doppelgänger will break the left switch on the mirror side, clearing the way to the right switch on Tyyni’s side.
3. Move right 1x, up 1x, right 2x, up 1x, right 3x, down 3x, right 2x, up 2x. Stepping on the right switch, Tyyni will appear on the mirror side.
4. Move up 1x, right 2x, up 1x, left 6x, down 2x, right 1x, up 2x, left 2x, down 2x, left 1x. The doppelgänger will break the left switch, opening the gate.
~~
Final efficiency score: 1194/1200 if no mistakes or unnecessary moves made. By the way, the game creator Beranek has listed the conditions for full 1200/1200 score under ‘Game News’ at the game page in Kongregate.

Thank you for for the walkthrough c: But your solution for room 4 is 25 steps and gives you 95 points on the test 😮
LikeLike